The Ocean API provides a testing framework that you use to run tests on your plug-in modules. You may also run tests on Petrel by using the testing framework. This allows you to create unit tests that are run in an automated build and test environment to test your plug-in when modifications are checked in.
The Ocean API testing framework currently supports data access and all Ocean APIs related to data access. Some of Ocean APIs may be used only when running in test mode. These APIs are related primarily to the Slb.Ocean.Petrel.ProjectService project-handling service. The testing framework does not support any UI-related functions, but this functionality is planned for future releases. Currently, you cannot perform tests related to items such as menus and toolbar buttons.
When you use the testing framework to run tests, Petrel initializes in test mode. Because of Petrel implementation restrictions, NUnit is the only test system currently supported. Use the test runner application associated with the test system or another test runner application.
Ocean provides a wizard to create a unit test project by using the Ocean Testing framework for an existing Ocean plug-in called the Ocean Plug-in Test wizard. The Ocean Testing Framework demands several manual and time-consuming configuration steps in the process of creating a test project. To minimize manual steps, minimize mistakes, and boost developer productivity, the Ocean Plug-in Test project wizard wraps up all of these steps in three clicks.
The examples in this chapter, however, illustrate the use of the test framework by using NUnit and its associated graphical user interface. Find additional information on unit testing in the OceanForPetrel.chm file in the "Testing Framework" white paper. Additionally, the Samples folder of your Ocean installation contains a UnitTesting sample.
Note: Ocean Testing Framework PetrelEngine does not support some visualization and user interaction related APIs, like the camera for 3D window Window3D.Camera3D, setting ToggleWindow domain, setting Intersection for IntersectionWindow, etc.
This section outlines the steps required to create and use the unit testing framework.
The Ocean Plug-in Test project wizard quickly and easily creates the unit test project for you. Select the Visual Studio project you want to test and the NUnit installation folder, and then create the project. The wizard handles these configuration requirements:
The test project must contain a reference to the assembly of the plug-in to be tested.
The test project assembly must be named with the same assembly name of the plug-in to be tested plus the suffix .Test. For example, if the assembly name of the plug-in to be tested is MyCompany.MyPlugin then the test assembly name must be MyCompany.MyPlugin.Test.
The test project output path (the destination where the assembly and compilation artifacts are stored) must be set to the Petrel installation folder.
Reference paths must point to the Petrel installation and public (PETREL_HOME/Public) folders as well as to any additional required folders.
A reference to the Ocean Testing Framework assembly (Slb.Ocean.Petrel.Testing.dll) must be added to the test project.
The Petrel configuration file (petrel.exe.config) must be copied into the test project, renamed with the same test project assembly name (for example, MyCompany.MyPlugin.Test.dll.config), and have its property Copy to Output Directory set to Copy always.
Add references to NUnit unit testing framework assemblies.
Note: Due to Petrel implementation restrictions, the Ocean Testing Framework supports only NUnit as the test framework.
A new Plug-in Test Visual Studio project is created, including this configuration, a test set up class, and a test template class.
Your Visual Studio Unit test project structure resembles Figure 4‑1.
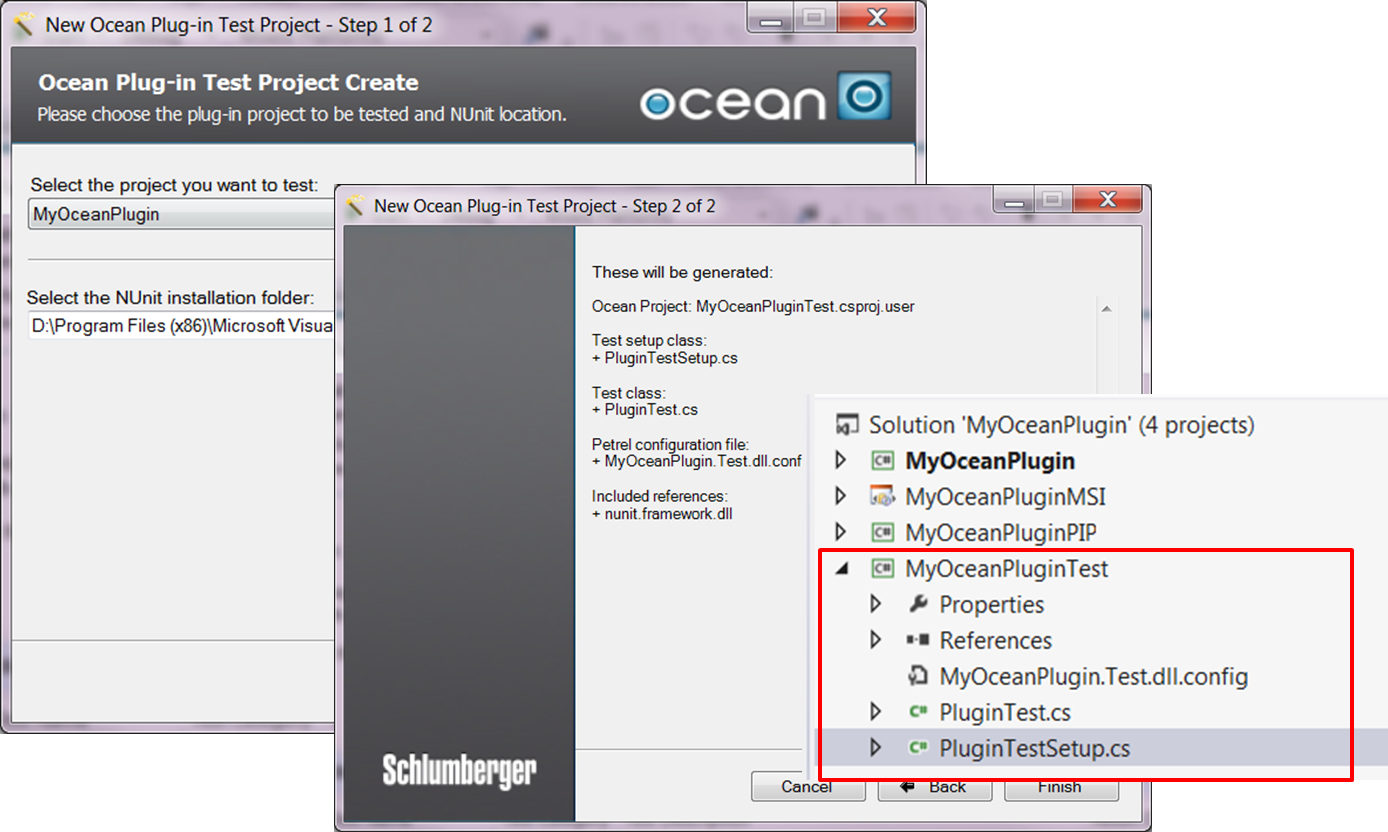
Figure 4‑1 Generated unit test Visual Studio project
After you create the project files, start coding the unit test against the plug-in to be tested.
For details on how to use the Ocean Plugin Test wizard, refer to "Creating an Ocean Plug-in Test Project" in the OceanWizardsAndDevelopersTools.pdf found in your Ocean installation Getting Started directory.
Note: The Ocean Plug-in Test wizard correctly generates your Visual Studio test project for you. This section is provided for reference.
The tests performed by the Ocean unit testing framework are defined in a separate project in your Visual Studio solution. This project must create a normal C# class library. The project must have these features:
A build target path of the Petrel installation directory.
The Petrel installation directory as a reference path.
The public directory under the Petrel installation directory as a reference path.
A reference to Slb.Ocean.Petrel.Testing.dll. This is the assembly that contains the Ocean Testing Framework.
A reference to the assembly for the modules being tested.
References to any assemblies required for your unit test system (NUnit).
A configuration file for the test project called <testproject>.dll.config, where <testproject> is the name of your Visual Studio unit testing project. Copy the contents of this configuration file from your petrel.exe.config file; it must include the modules defined in the PetrelInternalTrust trust. You may include any or all of the modules defined in your petrel.exe.config file. The location of this configuration file must be the same as your unit testing project assembly so set the project Copy to Output Directory property to Copy Always.
In the <testproject>.dll.config configuration file for the test project, confirm these entries are there (they are set up by the wizard):
<configSections>
<section name="oceanConfiguration" type="Slb.Ocean.Core.Configuration.OceanConfigurationSection, Slb.Ocean.Core, Version=2026.1.1.0, Culture=neutral, PublicKeyToken=14ef4a483ef6a64b" />
</configSections>
<oceanConfiguration productName="Petrel 2026.1" productFamilyName="Ocean Petrel">
<pluginManagerSettings>
<pluginProviders>
<add uri="{ApplicationData}\SLB\Petrel\2026\PluginManagerSettings.xml" typeName="Slb.Ocean.Core.Configuration.PluginXmlProvider, Slb.Ocean.Core" name="UserAppData" />
<add uri="{CommonApplicationData}\SLB\Petrel\2026\PluginManagerSettings.xml" typeName="Slb.Ocean.Core.Configuration.PluginXmlProvider, Slb.Ocean.Core" name="CommonAppData" />
</pluginProviders>
<securityProvider uri="{ApplicationData}\SLB\Petrel\2026\PluginManagerSettings.xml" typeName="Slb.Ocean.Core.PluginSecurityProvider, Slb.Ocean.Core" />
</pluginManagerSettings>
</oceanConfiguration>
A C# source file that contains a class that sets up and tears down the testing environment, shown in Figure 4‑2 as AssemblySetup.cs. This class calls methods that initialize the Petrel engine before the tests start and tears down the Petrel engine after the tests complete.
Source files that contain the tests to be run. These define tests according to the test system that you are using. For NUnit, these files have a TestFixture attribute for the class defining the tests and Test attributes defining each test.
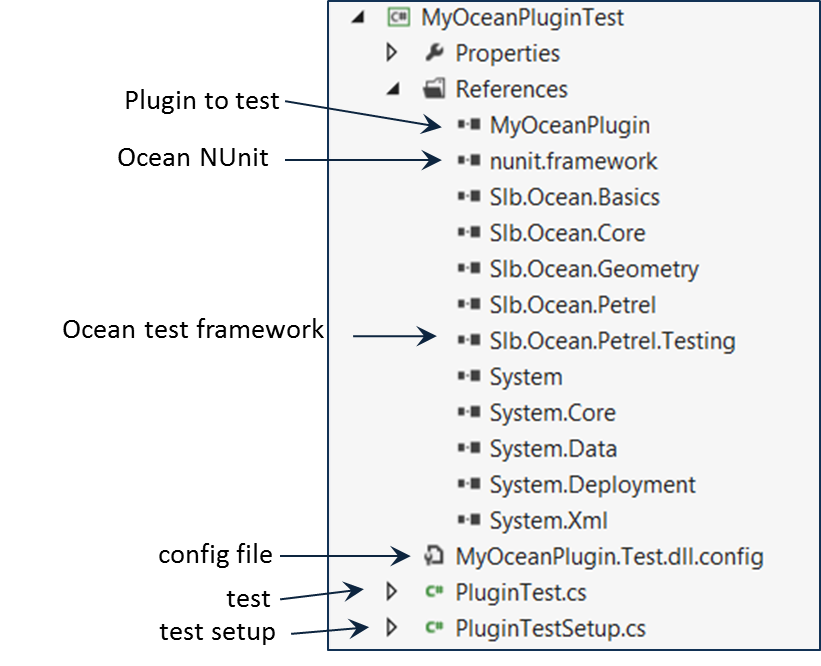
Figure 4‑2 Unit test project in Visual Studio
Note: The Ocean Plug-in Test wizard correctly sets up your Visual Studio test environment for you. This section is provided for reference.
The set up for the testing environment in Figure 4‑2 is contained in the source file AssemblySetup.cs. (The wizard generates the file named PluginTestSetup.cs.) This source is mostly the same for any unit test projects you create. It contains a class that has methods that run before and after the tests are run.
using System;
using System.Collections;
using System.Collections.Generic;
using System.Linq;
using System.Windows.Forms;
using System.Reflection;
using System.IO;
using Slb.Ocean.Basics;
using Slb.Ocean.Coordinates;
using Slb.Ocean.Core;
using Slb.Ocean.Data.Hosting;
using Slb.Ocean.Geometry;
using Slb.Ocean.Petrel;
using Slb.Ocean.Petrel.Basics;
using Slb.Ocean.Units;
using Slb.Ocean.Petrel.UI;
namespace ChapterTwo.Example1
{
  public class MyPluginA : Slb.Ocean.Core.Plugin
  { // ...
    public override string Name
    {
      get { return "My Plugin A"; }
    }
    public override string DeploymentFolder
    {
      get { return "MyCompanyNamePlugin A"; }
    }
    public override string ImageResourceName
    {
      get { return null; }
    }
    public override string AppVersion
    {
      get { return "2026.1"; }
    }
    public override string Author
    {
      get { return "dfoster"; }
    }
    public override string Contact
    {
      get { return "contact@company.info"; }
    }
    public override IEnumerable<PluginIdentifier> Dependencies
    {
      get { return null; }
    }
    public override string Description
    {
      get { return ""; }
    }
    public override Uri PluginUri
    {
      get { return new Uri("http://www.pluginuri.info"); }
    }
    public override IEnumerable<ModuleReference> Modules
    {
      get
      {
        yield return new ModuleReference(typeof(MyModule));
      }
    }
    public override PluginIdentifier PluginId
    {
      get { return new PluginIdentifier( typeof(MyPluginA).FullName,
      typeof(MyPluginA).Assembly.GetName().Version); }
    }
    public override ModuleTrust Trust
    {
      get { return new ModuleTrust("Default"); }
    }
  }
  public class MyModule : IModule
  { /* implementation ... */
    public MyModule(){}
    public void Initialize() {}
    public void Integrate() {}
    public void IntegratePresentation() {}
    public void Disintegrate() {}
    public void Dispose() {}
  }
}
}
In the example, the SetUpFixture attribute is provided to indicate that this is the set up class for the testing environment. This is a NUnit attribute. The SetUp and TearDown attributes are also NUnit attributes and, as their names imply, they are used to define the method to call before running tests and the method to call when all tests are run. Within these methods you do whatever is required to set up and clean up the testing environment. In the example, ProjectService is used to open a Petrel project that is needed for the unit tests.
There are two different ways to set up your licenses for the PetrelEngine to work:
The old way where you set up the profile before you use it
The new way where you use the license bundle directly
In the old way, you follow these steps to set up the profile before using it:
- Open Petrel UI and select licenses.
- Save that as a profile.
- Run PetrelEngine with these parameters:
PetrelEngine.Instance.Initialize(\ "-licensePackage <your_profile_name>");
In the new way, follow these steps to use the license bundle:
- Get your license bundle name either from the license file itself, or from the Petrel License selection dialog box. Right-click your bundle and select List users, and the License ID is at the top of the dialog box that opens.
...
FEATURE [Petrel_61140362_MAAAODmgP/aUA]{.mark} slbsls 5014.12 28-may-2017 200 \
VENDOR_STRING=yynnyyyyyyyyyyyyyyyyynnynyyyyyynnnnnnnnnnnnnnnnn \
SUPERSEDE=Petrel_61140362_MAAAODmgP/aUA ISSUED=28-Feb-2017 \
NOTICE="SLB R&E - STAVANGER 1-W1AQK0" SN=1-W1AQK0 \
...
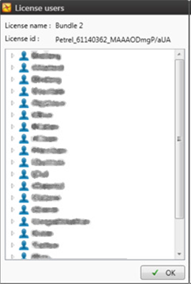
Figure 4‑3 Bundle License Name in License users dialog box
- Run PetrelEngine with these parameters:
PetrelEngine.Instance.Initialize(\ "-licensePackage <your_bundle_license_name>");
The unit tests you provide are defined by the TestFixture attribute. TestFixture indicates the class that defines a set of tests. Within this class you designate tests by using the Test attribute.
using System;
using System.Collections;
using System.Collections.Generic;
using System.Linq;
using System.Windows.Forms;
using System.Reflection;
using System.IO;
using Slb.Ocean.Basics;
using Slb.Ocean.Coordinates;
using Slb.Ocean.Core;
using Slb.Ocean.Data.Hosting;
using Slb.Ocean.Geometry;
using Slb.Ocean.Petrel;
using Slb.Ocean.Petrel.Basics;
using Slb.Ocean.Units;
using Slb.Ocean.Petrel.UI;
namespace ChapterTwo.Example1
{
  public class MyPluginA : Slb.Ocean.Core.Plugin
  { // ...
    public override string Name
    {
      get { return "My Plugin A"; }
    }
    public override string DeploymentFolder
    {
      get { return "MyCompanyNamePlugin A"; }
    }
    public override string ImageResourceName
    {
      get { return null; }
    }
    public override string AppVersion
    {
      get { return "2026.1"; }
    }
    public override string Author
    {
      get { return "dfoster"; }
    }
    public override string Contact
    {
      get { return "contact@company.info"; }
    }
    public override IEnumerable<PluginIdentifier> Dependencies
    {
      get { return null; }
    }
    public override string Description
    {
      get { return ""; }
    }
    public override Uri PluginUri
    {
      get { return new Uri("http://www.pluginuri.info"); }
    }
    public override IEnumerable<ModuleReference> Modules
    {
      get
      {
        yield return new ModuleReference(typeof(MyModule));
      }
    }
    public override PluginIdentifier PluginId
    {
      get { return new PluginIdentifier( typeof(MyPluginA).FullName,
      typeof(MyPluginA).Assembly.GetName().Version); }
    }
    public override ModuleTrust Trust
    {
      get { return new ModuleTrust("Default"); }
    }
  }
  public class MyModule : IModule
  { /* implementation ... */
    public MyModule(){}
    public void Initialize() {}
    public void Integrate() {}
    public void IntegratePresentation() {}
    public void Disintegrate() {}
    public void Dispose() {}
  }
}
This test simply checks the operation of a piece of the Ocean API. In this case it creates a new project, tests if the top level BoreholeCollection folder named Wells exists, and then creates it. Finally, it closes the project it created.
After the unit tests are defined, build the Visual Studio project containing them.
Note: The Ocean Plug-in Test wizard correctly sets up the environment. This information is provided for reference.
In the case of NUnit as a testing application, this is how the environment must be set up:
Set the output testing assembly to be in the Petrel installation directory. This is defined by the environment variable $(Ocean2026Home).
These files from the NUnit installation must be copied to the Petrel installation folder, or to a folder of your choice underneath it:
NUnit executable and configuration files to the Petrel folder
All assembly (.dll) files from the NUnit lib folder to the Petrel folder or a subfolder under it
All assembly (.dll) files from the NUnit framework folder to the Petrel folder or to a subfolder under it
Create a testing assembly configuration file in the Petrel installation directory. This .xml file must be a copy of the Petrel.exe.config file, but its name must be the same as the testing assembly file name with .config appended to the end (SomePluginTest.dll.config).\ If you copied the NUnit files in the previous step to a subfolder of the Petrel folder then you must modify the probing path defined in the testing assembly configuration file to include the subfolder definition.
The unit tests are run from:
Visual Studio using the NUnit Test Adapter
NUnit, either on the command line or with the NUnit graphical UI
The Ocean NUnit Test Adapter is a Visual Studio 2015 and Visual Studio 2019 extension that allows you to:
Display your tests in the native Test Explorer window from Visual Studio.
Run the tests and get results within the Visual Studio environment.
Have code coverage of the test execution.
Microsoft Team Foundation Server 2012 also supports this extension, which means that the tests are executed in a build environment with continuous integration.
Starting in the 2016 release you must install the Ocean NUnit Test Adapter separately. Find the installer at \\Program Files\Common Files\SLB\Ocean\Petrel\Common components\Visual Studio Extensions\Slb.OceanSdk.Petrel.TestAdapter.vsix.
Install the test adapter after finishing the Ocean for Petrel Framework installation. Once it's done, find the Ocean NUnit Test Adapter on the OCEAN menu in Visual Studio, as Figure 4‑4 shows.
Before running the tests, it is important to select the correct Petrel version and platform as shown in Figure 4‑4, because the test adapter needs to be aware of which Petrel version to be used in order to infer the correct Petrel installation path.
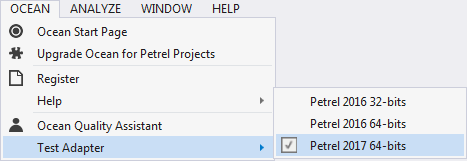
Figure 4‑4 Ocean test adapter in Visual Studio 2015
The Ocean NUnit Test Adapter requires the test assembly to be located inside Petrel's root folder in order to resolve the dependencies. For this reason, you must set the project's outputs to Petrel's root folder as well as select the correct Petrel version and platform.
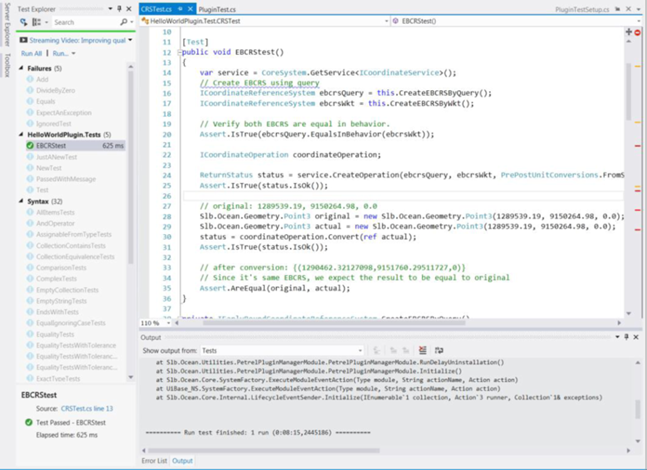
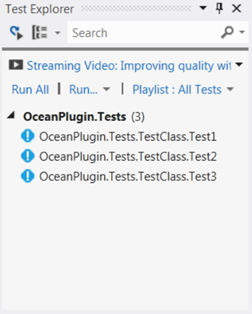
Figure 4‑5 Tests displayed in the Test Explorer pane in Visual Studio
After configuring the test project and the test adapter, you run the tests by using the Test Explorer window commands (i.e. Run All and Run...); this triggers the test execution. Visualize the test adapter's output in the Visual Studio Output window when the Tests option is selected in the Show output from: combo box.
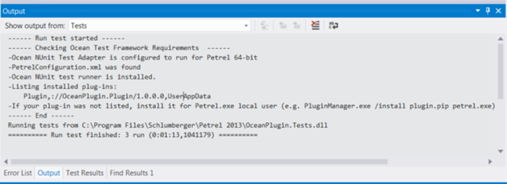
Figure 4‑6 Test output
The first section of the output verifies if the requirements to use the Ocean Testing framework are met. This includes the verification of the existence of the PetrelConfiguration.xml file, a list of the installed plug-ins, and other verifications.
It is important to watch this output, because when something goes wrong, it gives advice on how to execute the tests properly or explains why the Ocean Testing Framework could not be run.
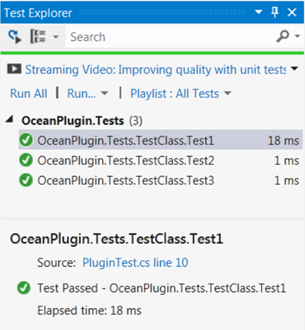
Figure 4‑7 Test Explorer with Test Results
After the test execution finishes, the tests are updated in the Test Explorer with the details of each test case.
Known issues to be aware of include:
The Test Explorer does not support hierarchical view of the test cases. As a consequence, all tests cases are displayed in a flat list.
Debugging mode: an error message is returned if the test execution is started with the debugger attached. However, it is possible to attach the debugger after the Petrel engine is initialized.
Code coverage in Microsoft Team Foundation Server is supported. However, it is necessary to filter the assemblies under test; otherwise, the code coverage tool attaches all Petrel's assemblies. This could cause the same crash caused by the debugger.
If the tests are run using the NUnit console then the command line is:
>nunit-console.exe /nologo /noshadow /process=Single\ mytesting_assembly.dll
Start the NUnit graphical UI from Visual Studio as an external program defined in the test projects properties Debug tab. It recognizes the test assembly's configuration file when it starts and loads the assembly. You then simply run the tests from the NUnit GUI.
When running the tests using the GUI version of the application it is important that you clear the check box for Enable Shadow Copy. Find this check box on the Tools menu (Tools - Settings* - Test Loader* - Advanced*).
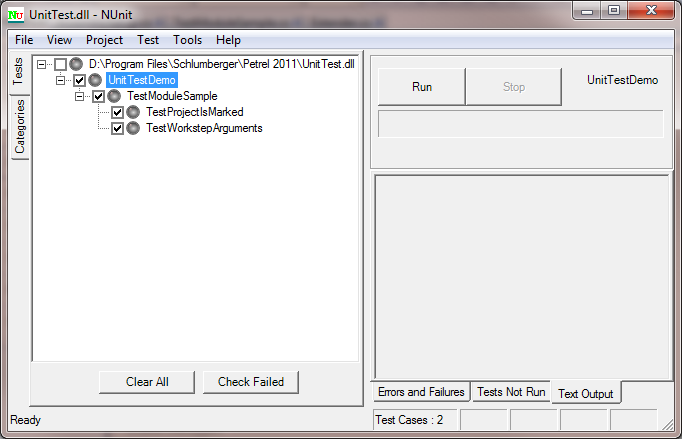
Figure 4‑8 NUnit GUI with test loaded and ready to run
When the tests are run, information about the tests is displayed:
Green or red indicators on the left side of the GUI show the status of the tests in the Tests lists
Output messages appear in the right side.
The status line at the bottom indicates the number of test cases, the number of tests run, and other quantitative information.
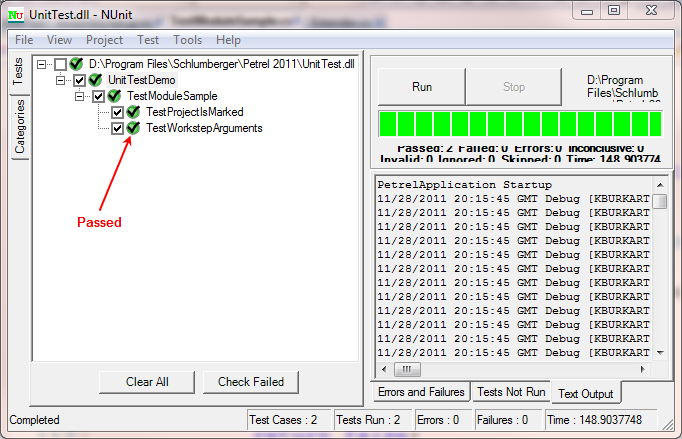
Figure 4‑9 NUnit GUI with tests completed
In these steps, your NUnit version may differ; make changes as appropriate.
A common error you may see when a dll is missing or not loaded is:
System.Reflection.Module._GetTypesInternal(StackCrawlMark& stackMark) at System.Reflection.Assembly.GetTypes() at Slb.Ocean.Petrel.Testing.PetrelEngine.InitializeInstance() at Slb.Ocean.Petrel.Testing.PetrelEngine.get_Instance() at UnitTestDemo.AssemblySetUp.RunBeforeAnyTests() in C:\Program Files\SLB\Ocean 202X\Samples\UnitTesting\UnitTest\AssemblySetup.cs:line 30
If you have trouble getting your NUnit test to run, check these items.
Follow these steps in Visual Studio:
- Check the reference path for both projects in this solution (TestModule and UnitTest) point to the Petrel instance you want to use, for example:
- C:\Program Files\SLB\Petrel 2026\, C:\Program Files\SLB\Petrel 2026\Public\*
- Check the output path (Build tab). For the TestModule project, set to the Petrel Extensions folder. For example:
- C:\Program Files\SLB\Petrel 2026\Extensions\*
- Check the output path (Build tab). For UnitTest project, set to the Petrel root. For example:
- C:\Program Files\SLB\Petrel 2026\*
Follow these steps in the File tree:
Make sure you have the additional testing assemblies copied to the Petrel root. For example, copy all files and subfolders from:
C:\Program Files (x86)\NUnit X.X.X\bin\net-X.X
to
C:\Program Files\SLB\Petrel 2026\
Make sure that nunit.exe.config and/or nunit-console.exe.config (in Petrel root) has the same settings in ProbingPath as Petrel.exe.config. In other words, it must be the original path (lib; addins;) plus all paths from Petrel. For example:
probing privatePath="lib;addins;Public;Extensions;Printing;Extensions\SLB\..."
Build the solution.
Start the NUnit-console (on the command line, from Petrel root) with these\ command-line parameters:
nunit-console.exe /nologo /noshadow /process=Single UnitTest.dll