The way a plug-in is deployed depends on the environment. There are two main deployment scenarios:
Commercial deployment to the Petrel user
Deployment during development
This chapter primarily presents deployment as it relates to the Petrel user. There are two main user deployment mechanisms:
.pip (Plug-In Package) file
.msi (Microsoft installer) file
Ocean has wizards to assist you with either of these deployment mechanisms. A plug-in must be installed by using a .pip file, although that installation may be done as part of an MSI installation.
Ocean provides wizards, in the form of Visual Studio Templates, to create Ocean installer projects. There are two types of installer wizards:
PipBuilder: PipBuilder creates a .pip file that the Petrel Plug-in Manager uses to install the plug-in. The .pip file is a specialized file that contains the assemblies required by the plug-in and an .xml file with plug-in information.
Ocean Wix Plug-in Installer: The Ocean Wix Plug-in Installer creates a project that builds an .msi (Microsoft Installer) file. The .msi file performs the installation of the previously built .pip file.
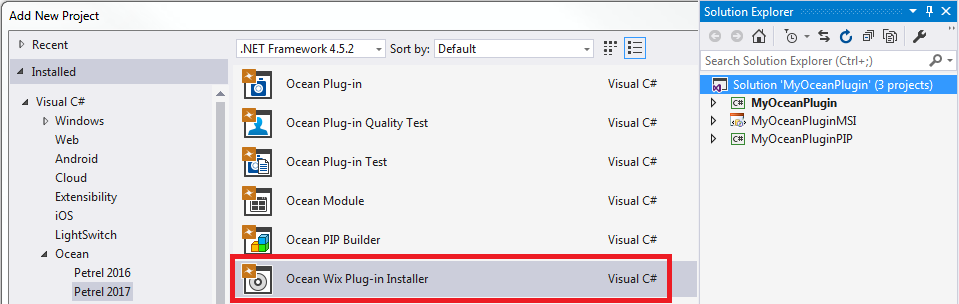
Figure 2‑1 Ocean wizards in Visual Studio New project dialog box
Signing plug-in assemblies and using a trust to provide security for the plug-in is discussed in the context of each deployment mechanism.
By default, plug-ins are installed to a folder name that is a combination of the plug-in name and the version. You may provide a custom folder name.
The PipBuilder project creates a .pip file by using the PluginPackager.exe utility (discussed later) that is used to install the plug-in. The .pip file is directly installed by the Petrel Plug-in Manager or installed via a command-line utility in the MSI installer. The .pip file is a specialized file that contains the assemblies required by the plug-in and an .xml file with plug-in identity information.
When you use the PipBuilder, your plug-in has an instance of the Plugin class. You specify the trust associated with the modules in the plug-in by setting the Plugin. Trust property in your Plugin implementation.
The recommendation is for your plug-in assembly to be signed with a strong name. Signing provides both uniqueness and security to your plug-in assembly. If your plug-in is going to be distributed through the Ocean Store then signing it with a strong name is required. Find information on signing on Microsoft's MSDN website or by Googling "Visual studio strong name signing."
The PipBuilder wizard in the Visual Studio Add New Project dialog box is added to Visual Studio during the installation of Ocean. The basic workflow for the .pip file is divided into two parts:
The plug-in developer creates the .pip file.
The Petrel user then installs the .pip file.
The plug-in developer follows these steps:
Use the PipBuilder wizard to create a Visual Studio project. The project references other Visual Studio projects in the Visual Studio solution that contain the plug-ins to be installed.
If you have any third-party, non-Ocean assemblies that your plug-in uses or other files that must be installed along with your assembly, add them to the DeployList.xml file of the installer project. Alternately, copy all required files into the directory of the main plug-in assembly as a part of the build event or custom build activities before calling the PluginPackager utility.
Build your Visual Studio solution, which results in a .pip file that contains the assemblies required by your plug-in and a Plugin.xml file that defines the properties of your plug-in.
Find details of how to run the PipBuilder wizard in the UsingTheOceanWizard.pdf document in your Ocean installation area, Wizards subdirectory.
The PluginPackager.exe utility used to create the .pip file supports sharing DLLs between different plug-ins. It automatically adds the list of the plug-in's assemblies in the Plugin.xml metafile when building the PIP. The list is then populated to PluginManagerSettings.xml when the plug-in is installed and used by Ocean to resolve assembly references between plug-ins.
The Ocean Plug-in Acceptance Criteria and Checklist defines rules for well-behaved plug-ins. These rules are validated when plug-ins are submitted to the Ocean Store. Sometimes the plug-ins are rejected, and the plug-in developers must modify and re-test their plug-in. This is costly and prolongs the plug-in time-to-market. Furthermore, there are numerous plug-ins outside the store, both Schlumberger and client-owned, that do not go through the quality check process. Many Petrel minor releases faced compatibility issues with such plug-ins and about half of the time, the root cause was in the plug-ins' lack of adherence to the Ocean Acceptance check list rules. This causes Petrel releases to be delayed by days or weeks and the Petrel upgrade-installer to implement extra logic to make the plug-ins work after the upgrade. To make sure such issues are known and captured well in advance, long before the plug-in is released to the Ocean Store, Ocean has implemented the Plug-in Acceptance Criteria into the Ocean developer tools and the Framework. The plug-in validation mechanism outputs all warnings and errors detected at plug-in packaging time (PluginPackager.exe /p command when the PipBuilder project is built) to the console.
All usage of Petrel internal assemblies is generally discouraged as they are not covered by the stability promise. A plug-in that uses a Petrel internal assembly may break at any minor Petrel release. If you have a special need to use Petrel internal functionality encapsulated in an internal assembly, please contact the Ocean Portfolio so that they record a requirement to expose such functionality as part of the public API.
The PluginPackager.exe assumes that files in the Petrel installation directory tree other than those in the Extensions folder are internal Petrel libraries. If you have a copy of these files in your plug-in directory structure, the PluginPackager.exe fails to package the plug-in and reports which Petrel internal assemblies it found that you are using. Consequently, all Ocean assembly references in your plug-in Visual Studio project must have the Copy Local property set to False.
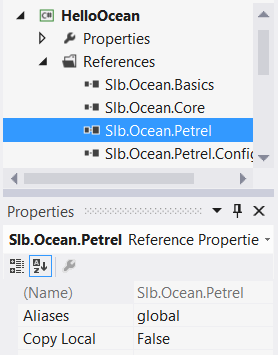
Figure 2‑2 Copy Local for Ocean references must be False
The best practice for referencing a C dll in your plug-in is to:
DllImport the C library
PInvoke SetDllDirectory(Path.GetDirectoryName(Assembly.GetExecutingAssembly().Location) before referring to an external call
Add the C dll to both the plug-in's build output directory and the DeployList.xml file of the installer project
While copying C dlls to the Petrel installation folder for debugging purposes may be necessary, this is not allowed in the final build environment for production. Because the C dlls are in the Petrel installation folder, they are assumed to be internal Petrel assemblies. While they remain there, you aren't allowed to add the C dlls to your plug-in deploy list (since you are not allowed to deploy duplicate Petrel assemblies) and the PluginPackager.exe fails to package the plug-in because it thinks you are using internal Petrel assemblies.
There are cases where the plug-in validation outputs validation errors to the console and stops the plug-in packaging operation. Petrel internal assembly usage is one of these conditions where the PluginPackager.exe fails to package the plug-in if the validation detects this condition. If you already have a waiver to use a Petrel internal assembly (or know that you will get one), then please use the following syntax to ignore the validation errors that occur when a Petrel internal assembly is used:
PluginPackager.exe /p <plugin_assembly> <output pip file> petrel.exe /waiveValidationErrors="PluginDependsOnPetrelInternalLibRule:<petrel_internal_assembly_name> | PluginDependsOnPetrelInternalLibRule:<another_petrel_internal_assembly_name>"Third party library validation in the plug-in packager validates third party libraries referenced in the plug-in against a third party list in PlatformLibraries.xml and from other commercial Ocean plug-ins in OtherPluginLibraries.xml. This validation is done by comparing the name hash and md5 checksum. The lists are updated periodically. For more information, please refer to the "Plug-in Identity and Deployment" white paper in the OceanForPetrel.chm file.
Ocean provides the HelpService API to allow the plug-in developer to register help items for their plug-in. These help items are either existing files on the file system (like pdf or html files) or custom actions. Help items are always displayed in the Help Center under My Plug-ins.
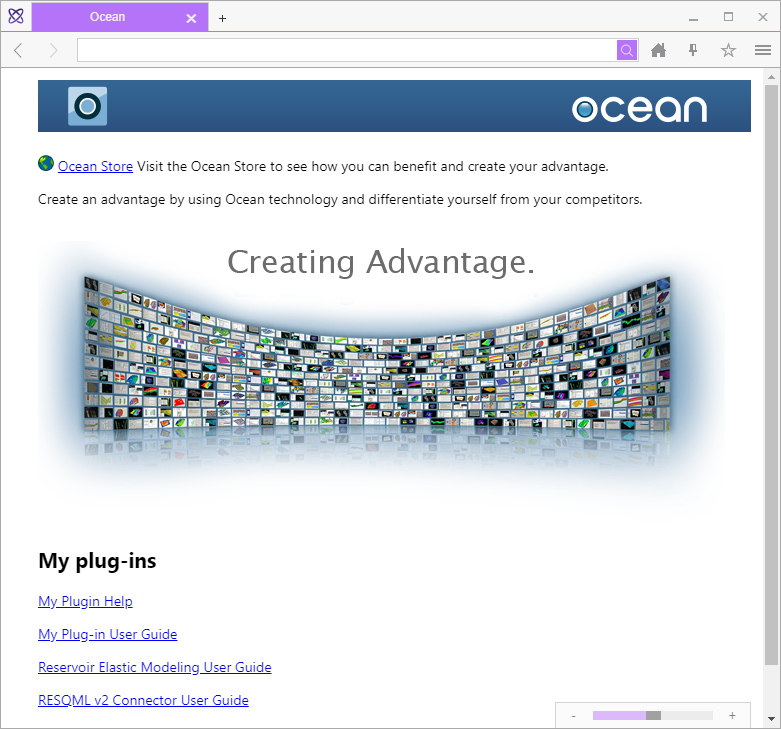
Figure 2‑3 Help items in Help Center
When you run the PIPBuilder wizard, the wizard does several things with the plug-in help files that you include:
Registers them in the IModule implementation by using HelpService so the help displays in the Petrel Help Center.\ For more information and examples on using the HelpService in your plug-in, see "Manage plug-in help files" in Ocean for Petrel Developer's Guide Volume 9: Petrel User Interface.
Copies the help files to the HelpFiles subdirectory of your PIP Visual Studio project.
Adds the help files to the PIP Visual Studio project PluginPackager postbuild event by using the --helpfile option so the help files are packaged with the plug-in.
At install time, the PluginPackager automatically indexes the plug-in HTML help files listed in the postbuild event to enable searching them in the Petrel Help Center. You must add metadata to your .html help file for this indexing to work correctly. See "Add metadata to .html help" on page 2-8 for more information.
This example shows the PluginPackager postbuild event:
"%OCEAN2026HOME%\PluginPackager.exe" /p
"$(ProjectDir)\obj\copytemp\ExamplePlugin.dll"
"$(TargetDir)\$(TargetName).pip" "%OCEAN2026HOME%\petrel.exe" -helpfile "$(ProjectDir)\HelpFiles\Plugin Help.htm"
Only HTML files are indexed for searching in the Petrel Help Center. All plug-in help files are required to be HTML format to be able to integrate into GURU help and enable indexing. The Ocean PIP BuilderWizard only supports adding help htm files and zip files of customGuru pages.
Multiple help file folders may be created during subsequent builds of the PipBuilder project. To avoid this issue, the PipBuilder wizard adds this command in the prebuild event of the PipBuilder project:
rmdir "$(ProjectDir)\obj\copytemp" /s /qGuru supports searching against and viewing HTML documentation only. When a HTML help page is added to Guru via the PluginPackager, the page gets indexed so that it is searchable by the Petrel user. Starting from Ocean 2015, you need to add metadata to your help content HTML for the indexing to happen correctly at install time. If no metadata is added, only the page title is indexed.
The page title is always indexed; it is obtained from the <title> tag in the header. The title field is the display name of the page you are indexing. For example, if your page is called "2D seismic interpretation", the HTML tag reads:
<title>2D seismic interpretation</title>The metadata includes page information such as description and keywords and also associated metadata such as the domain and difficulty. If no value is found for a field it is left blank and it cannot be searched against.
These <meta> tags in the html <Head> are used by the indexer and they need to be set to have more than the title indexed (particularly the keywords field).
The data that is indexed needs to be in the <Head> section of the HTML file. The format expected for each field is:
<meta name="*field*" content="*data*"/>
Note: The syntax of this tag is very important. The name attribute must come before the content attribute and the tag must be terminated with a forward slash. Do not use a full closing tag (i.e. </meta>).
Table 2 shows the available fields and the data that may be entered.
Table 2 Guru metadata fields and values
| Field | Description | Values |
|---|---|---|
| keywords | Words related to the page content. Used in search. | Any plain text |
| description | The description of the page. This is displayed in the search results. | Any plain text value |
| domain | The domain of the page. This is displayed in the search results. | General Geophysics Reservoir Engineering Geology Exploration Geology Shale Studio Production Drilling |
| difficulty | The level of difficulty of the content contained in the page. | Introductory Intermediate Advanced |
| pagetype | The type of the page. | General Workflow Training Quick Guide Links Flowchart Practical Theory Quality Check |
| author | The company or individual who authored the page. | Any plain text value. |
| contentId | The ID of the page. Allows pages and files to change name over time but the page to be classed as the same. | Any string value. (If you do not have a standard in place, it is suggested to use GUIDs) |
Multiple entries are valid for the keywords field. Each keyword entry is delimited by the string " , " (space comma space). The expected format of multiple entries is:
<meta name="keywords" content="keyword1 , keyword2 , keyword3"/>The domain, difficulty, pagetype, and author fields are filters that the Petrel user searches against in Guru.
Values for the domain, difficulty, and pagetype fields are case sensitive and must appear exactly as displayed in Table 2.
This example is the complete contents of a skeleton HTML file with no body. It contains all the fields to be fully indexed into the Guru search system with valid data fields.
<!DOCTYPE html>
<HTML>
<HEAD>
<title>My page</title>
<meta name="keywords" content="keyword1 , keyword2 , keyword3"/>
<meta name="description" content="This is an example page that contains metadata to be fully indexed in Guru."/>
<meta name="domain" content="Geophysics"/>
<meta name="difficulty" content="Introductory"/>
<meta name="pagetype" content="Training"/>
<meta name="author" content="SLB"/>
<meta name="contentId" content="76yt7yu-28af-6556-a8a5-t6y7uj839"/>
</HEAD>
<BODY>
</BODY>
</HTML>The Petrel user follows these steps:
The Petrel user starts Petrel and uses the Plug-in Manager (Help - Ocean Plug-in Manager*) to install the plug-in. The install unpacks the .pip file and modifies the PluginManagerSettings.xml file, where installed plug-in information is maintained.
The Petrel user restarts Petrel after the plug-in is installed to have the plug-in available in the next Petrel session.
The Ocean Wix Plug-in Installer wizard creates a Visual Studio project that, when built, results in an .msi (Microsoft Installer) file that installs the plug-in .pip file that is created by the PipBuilder project.
Use the Ocean Wix Plug-in Installer project when a simple .pip file installation with Plug-in Manager does not meet the needs of your project. You further customize the resulting MSI installer project by adding extra installer actions. It is also possible to combine more than one plug-in (.pip files) into one MSI installer as a plug-in bundle, although plug-ins installed together as a bundle cannot be uninstalled individually.
Using the Ocean Wix Plug-in Installer is recommended when you have a special requirement that the PIP project cannot handle (for example, custom actions, pre-/post-installation steps, or installation of third-party prerequisites).
The Ocean Wix Plug-in Installer uses WiX Toolset 3.11 or higher for Visual Studio 2022, which you must download and install yourself from wixtoolset.org.

Figure 2‑4 WiX toolset installation
To use the Ocean Wix Plug-in Installer, follow these steps:
Install the appropriate WixToolset version.
Add one or more Ocean Plug-in projects to the solution.
Add a PIP Builder project for each plug-in.
Compile the PIP builder projects to create the .pip files.
Add this Ocean Wix Plug-in Installer project for the .pip files.
The Wix Plug-in Installer wizard has a Plug-in Startup Optimization option; by default, it is unselected. To get the best start up performance while loading Petrel, select this option, which enables use of the Native Image Generator (Ngen.exe). Petrel itself uses Ngen by default to improve start up performance.
Find details for running the Ocean Wix Plug-in Installer wizard in the UsingTheOceanWizard.pdf document in your Ocean installation area, Wizards subdirectory, and in the ReadMe.txt file added to the Ocean Wix Plug-in Installer MSI project.
Note: 1. The Ocean Wix Plug-in Installer wizard builds a project that is a generic .msi installer project. The .msi is not Ocean-specific, so seek detailed information regarding .msi files through MSDN.
You may find the msiexec.exe command-line utility from Microsoft helpful in debugging any installer issues. This command has a variety of options.
You may add your custom installer class that derives from System.Configuration.Install.Installer and has the [System.ComponentModel.RunInstaller(true)] attribute. Its Install and Uninstall methods contain your tasks, which are called at MSI installation and uninstallation, respectively.
Ocean Wix Plug-in Installer wizard requires prior WIX installation. If you see the error "The template specified cannot be found. Please check that the full path is correct" when running the Ocean Wix Plug-in Installer wizard, you may need to reinstall WIX. This error is generated by Visual Studio when there are no WIX templates installed or available; this may happen if Visual Studio is installed after WIX is installed. Check if you are able to create WIX projects in Visual Studio; go to Add new Project > Templates > Windows Installer XML > Setup project. If you do not see the Windows Installer XML templates in Visual Studio as shown in Figure 2‑5, you need to reinstall WIX.
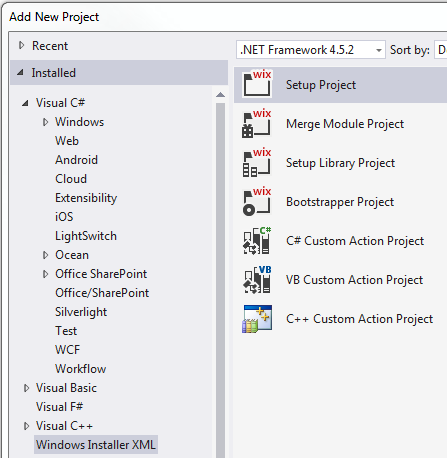
Figure 2‑5 Wix templates required for Ocean Plugin Wix Installer
Two command-line deployment utilities are available to use in custom actions in an MSI installer, as build events in the development environment, or in a scripted upgrade scenario (stop Petrel, run PluginManager.exe to uninstall old plug-in version, run PluginManager.exe to install a new plug-in version, run Petrel).
The PluginManager.exe utility is available in the Petrel installation area. It is used from the command line or from a custom action in an MSI installer to install, uninstall, enable, and disable Ocean for Petrel plug-ins (.pip files).
The format of the pluginIdentifier is ://MyPluginUniqueId/1. 0. 0. 0 when this code is used inthe Plugin. PluginId property implementation:
new PluginIdentifier("MyPluginUniqueId", new Version(1,0,0,0));To install a plug-in into PluginManagerSettings.xml in the user's %AppData% folder, use this option:
/install inputPIP hostExecutable
PluginManager.exe /install "C:DeploymentMyProject.pip""%OCEAN2026HOME%Petrel.exe"
To install a plug-in into PluginManagerSettings.xml in the %ALLUSERSPROFILE% folder, use the /install option. Add installerId:your_installer_guid if you call it from your MSI installer.
/install [/allusers] inputPIP hostExecutable
PluginManager.exe /install /allUsers "C:DeploymentMyProject.pip""%OCEAN2026HOME%Petrel.exe"
To uninstall a plug-in from PluginManagerSettings.xml in the user's %AppData% folder, use the /uninstall option.
/uninstall pluginIdentifier hostExecutable
PluginManager.exe /uninstall ://MyPluginUniqueId/1.0.0.0"%OCEAN2026HOME%Petrel.exe"
To uninstall a plug-in from PluginManagerSettings.xml in the %ALLUSERSPROFILE% folder, use the /uninstall option. Add /runFromInstaller if you call it from your MSI installer.
/uninstall [/allusers] pluginIdentifier hostExecutable
PluginManager.exe /uninstall /allUsers ://MyPluginUniqueId/1.0.0.0"%OCEAN2026HOME%Petrel.exe"
To enable a plug-in for all users, use the /enable option. Use the /allusers option to enable the plug-in for all users.
/enable [/allusers] pluginIdentifier hostExecutable
PluginManager.exe /enable /allUsers ://MyPluginUniqueId/1.0.0.0"%OCEAN2026HOME%Petrel.exe"
To disable a plug-in, use the /disable option. Use the /allusers option to disable the plug-in for all users.
/disable [/allusers] pluginIdentifier hostExecutable
PluginManager.exe /disable /allUsers ://MyPluginUniqueId/1.0.0.0"%OCEAN2026HOME%Petrel.exe"
Use the /list option to list installed plug-ins:
/list hostExecutable
Lists plug-ins installed for the specified host application.
/listAllLocal hostExecutable
Lists all locally installed plug-ins for the specified host application, under all user profiles.
The PluginPackager.exe utility is a command-line utility that is available in the Petrel installation area. It packages a plug-in into a single .pip file.
PluginPackager.exe packs the plug-in under the specified folder and includes all other files and all its subfolders into a single .pip (Petrel Installer Package) file. This means you may copy all required files to the main plug-in assembly directory as part of the project build action or custom build activities before calling PluginPackager. Install the .pip file with the Ocean Plug-in Manager in Petrel; it installs the plug-in in the .pip file to the plug-in default home.
The PluginPackager.exe utility that is used to create the .pip file supports sharing DLLs between plug-ins. The utility automatically adds the list of plug-in assemblies to the Plugin.xml metafile when building the .pip file. The list is then populated to PluginManagerSettings.xml when the plug-in is installed and is used by Ocean to resolve assembly references between plug-ins.
To pack a plug-in in a directory with other deployment files in the same directory and create the . pip file:
/p <Plugin assembly> <output pip file>
PluginPackager.exe /p "C:MyProjectbinDebugMyPlugin.dll""C:DeploymentMyProject.pip"
You must add the path of external libraries (e.g. assemblies that are shared between plug-ins) to the probing paths defined in the PluginPackager.exe.config file.
Validate your plug-in against the Ocean Plug-in Acceptance Test rules by supplying the location of the Petrel executable as the hostExecutable argument to PluginPackager.exe /p:
/p <Plugin assembly> <output pip file> <hostExecutable>
PluginPackager.exe /p "C:MyProjectbinDebugMyPlugin.dll""C:DeploymentMyProject.pip" "%OCEAN2026HOME%petrel.exe"
PluginPackager.exe returns these error codes:
0 if there were no validation errors and the .pip file was created successfully.
The number of validation errors when the .pip file was created successfully.
99 if the .pip file could not be created.
When the PluginPackager.exe /p is part of a postbuild event, validation errors may cause the build fail. Handle the PluginPackager.exe error codes in either the project file or in the postbuild event.
In the project file, add this code to the end of the csproj file to ignore the PluginPackager.exe exit code:
<Target
  Name="PostBuildEvent"
  Condition="'$(PostBuildEvent)'!=''"
  DependsOnTargets="$(PostBuildEventDependsOn)">
  <Exec WorkingDirectory="$(OutDir)" Command="$(PostBuildEvent)" IgnoreExitCode="true" />
</Target>
Another way to handle the error code in the project file is to add this example instead to create a build warning; the build succeeds:
<Target
  Name="PostBuildEvent"
  Condition="'$(PostBuildEvent)'!=''"
  DependsOnTargets="$(PostBuildEventDependsOn)">
  <Exec WorkingDirectory="$(OutDir)" Command="$(PostBuildEvent)" ContinueOnError="true" />
</Target>
This example shows handling the error codes in the postbuild event itself:
PluginPackager.exe /p <Plugin assembly> <output pip file> <hostExecutable>

if "%ERRORLEVEL%" == "0" goto End

if "%ERRORLEVEL%" == "99" goto PipCreationError

echo %ERRORLEVEL% Plug-in validation error(s) occurred.

goto End

:PipCreationError

echo pip could not be created.

REM Let the build fail if the pip could not be created

exit 1

:End

REM Post build event always succeeds in case of no errors or plug-in validation errors only

exit 0
Generate a plug-in metafile for a plug-in and then merge that metafile into the PluginManagerSettings.xml file for Petrel to install your plug-in in the development environment.
Use the /g option to generate a plug-in metafile:
/g <Assembly> <output plugin meta file>
PluginPackager.exe /g "C:MyProjectbinDebugMyPlugin.dll""C:MyProjectplugin.xml" "%OCEAN2026HOME%petrel.exe"
Use the /m option to merge a plug-in metafile into the PluginManagerSettings.xml file for a specific hosting application:
/m <plugin meta file> <hostingapplication> <Plugin Path>
PluginPackager.exe /m "C:MyProjectplugin.xml""%OCEAN2026HOME%petrel.exe" "C:MyProjectbinDebug"
Use the /u option to uninstall a plug-in from the PluginManagerSettings.xml file for a specific hosting application:
/u <PluginIdentifier> <hostingapplication.exe>
PluginPackager.exe /u "://MyPlugin/1.0.0.0""%OCEAN2026HOME%petrel.exe"
The format of the pluginIdentifier is ://MyPluginUniqueId/1.0.0.0 when this code is used in the Plugin.PluginId property implementation:
new PluginIdentifier("MyPluginUniqueId", new Version(1,0,0,0));
PluginPackager.exe has an API which is used internally by the Petrel Plug-in Manager UI.
For completeness, deployment during the development process is discussed here. When you are developing the plug-in you find that, under normal circumstances, when you build the solution the plug-in is automatically deployed to the Petrel environment on your machine. The build process in Visual Studio follows these steps:
- Compiles the plug-in code to create the assembly.
- Creates a plugin.xml file in the Visual Studio folder for the plug-in project.
- Merges the plugin.xml file with the PluginManagerSettings.xml file that is in the user's [AppData]\Roaming\Schlumberger\[Petrel Version] folder.
The scripting that creates these steps is put in place by the Ocean Wizard when a new plug-in is created in Visual Studio as the project's build events. It uses the PluginPackager.exe utility discussed previously to generate the plug-in metafile and then merge that plug-in metafile into the PluginMangerSettings.xml.
del "$(ProjectDir)plugin.xml"

"%OCEAN2026HOME%\PluginPackager.exe" /g "$(TargetPath)" "$(ProjectDir)\plugin.xml" "%OCEAN2026HOME%\petrel.exe"

"%OCEAN2026HOME%\PluginPackager.exe" /mh "$(ProjectDir)\plugin.xml" "%OCEAN2026HOME%\petrel.exe" "$(TargetDir)"A new feature in Visual Studio 2015 enables edit and continue after you attach the debugger. This allows developers to attach the debugger, pause debugging, edit the code, and then resume without having to restart Petrel. To enable the feature, set up your start-up Visual Studio project Debug section to start cmd.exe with the arguments that set the crucial environment variable COMPLUS_FORCEENC. Add the following arguments to the Command line arguments section:
/C "set "COMPLUS_FORCEENC=1" && "%OCEAN2026HOME%\Petrel.exe""

Figure 2‑6 Debug settings for the startup project.
Then either start without debugging (on the debug menu or using Ctrl + F5) or start Petrel directly. Attach to the launched Petrel process after the license dialog comes up. Attaching to Petrel prior to the license dialog causes an error due to a security feature put in place to avoid exposing Petrel's licensing implementation.
A Scripting Tool is available in Visual Studio that runs in conjunction with Petrel. The use case for this tool is to discover new APIs and explore API functionality without you having to build a custom plug-in.
This feature requires a Petrel plug-in, also called Scripting Tool, that pairs the Visual Studio script with Petrel to execute the script code. The Petrel Scripting Tool plug-in is automatically installed into Petrel during the Ocean Framework installation.
The Scripting Tool is fully documented in the OceanWizardsAndDevelopersTools.pdf found in your Ocean installation Getting Started directory.
This section contains additional topics that relate to deploying and running your plug-in in Petrel. A Plugin class implementation is mandatory and required for all plug-ins.
By default, plug-ins are installed to a directory under [Petrel Home] called \Extensions. This folder is considered the default [Plug-ins Home] directory. However, you may install plug-ins in other folders where the user has write permission if, for example, this permission is not allowed under the Petrel installation folder by company policy.
To change the default directory, open the PluginManagerSettings.xml file (see locations below), find the <DefaultDirectory> tag, and update the value in the Location parameter with the new path. For example:
<OceanApplicationShell>
<ApplicationShell>
<Name>Petrel</Name>
<DefaultDirectory Name="Default" Location="C:ProgramFilesSchlumbergerPetrel 2026Extensions" />
...
</ApplicationShell>
</OceanApplicationShell>
could be changed to:
<DefaultDirectory Name="Default" Location="C:MyPlugins" />The DeploymentFolder property defines the relative path where this plug-in is deployed when installed in Petrel. The absolute installation path is [DefaultDirectory]\[DeploymentFolder]. DeploymentFolder may contain backslashes to define the hierarchy of folders where plug-ins are deployed.
[DefaultDirectory] is defined in %APPDATA%\Schlumberger\Petrel\201X\PluginManagerSettings.xml in the <DefaultDirectory> tag, which is defaulted to <PetrelInstallDirectory>\Extensions.
In this example, the plug-in is installed in the MyCompanyName subdirectory in the Petrel plug-in installation directory.
public class MyPluginA : Slb.Ocean.Core.Plugin
{ // ...
  public override string Name
  {
    get { return "My Plugin A"; }
  }
  public override string DeploymentFolder
  {
    get { return "MyCompanyNamePlugin A"; }
  }
}
If the DeploymentFolder property is not defined, the plug-in is deployed in a [PluginName]_[PluginVersion] relative folder, where PluginName is defined by Plugin.Name property and PluginVersion is the version of the main plug-in assembly.
To encourage plug-in developers to improve the start up time of their plug-ins, the initialization time of a plug-in is reported in the Ocean Plug-in Manager user interface.
The start up time is calculated as the total time of all of the plug-in's IModule.Initialize, IModule.Integrate and IModule.IntegratePresentation. Only have necessary steps in those module start up methods (like license checks, integrating UI elements, etc.) Move those steps that could be done later to the stage when the plug-in is actually starting to work (for example, on Workspace.Opened).
If a plug-in's initialization time is longer than 1 second, a warning icon and message are displayed in the Ocean Plug-in Manager, as Figure 2‑7 shows.
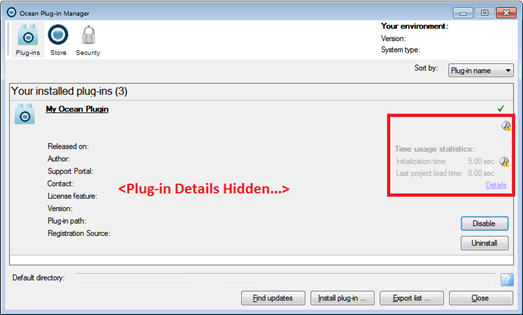
Figure 2‑7 Ocean Plug-in manager displaying start up performance warning
PluginManagerSettings.xml contains all the setting information of the Plug-in Manager, including the metadata of all the installed plug-ins. There are multiple copies of PluginManagerSettings.xml to support the full range of single-user scenarios, including those with User Account Control (UAC):
In Petrel's installation folder: Supports a company-wide push deployment of Petrel repackaged together with a number of plug-ins as a monolithic bundle. If Petrel is installed into a UAC-protected folder (for example, the default %ProgramFiles%) then the PluginManagerSettings.xml is protected by UAC. Therefore, only administrators may edit it. It cannot be edited through the Petrel Plug-in Manager GUI nor the PluginManager.exe.
In c:\Users\All Users (%ALLUSERSPROFILE%) : Supports company-wide push deployment/undeployment of individual plug-ins. UAC elevation is required to edit this file. Manage it with PluginManager.exe.
In current user's profile (%AppData%) : Supports individual user customization. UAC elevation is not required to edit this file.Manage it using either the Petrel Plug-in Manager GUI or the PluginManager.exe.
The PluginManagerSettings.xml files in %AppData% and %ALLUSERSPROFILE% are automatically created the first time a plug-in is installed into them.
To prevent users from installing plug-ins, remove or comment out the blue highlighted entry from petrel.exe.config:
<oceanConfiguration productName="Petrel 2026.1"productFamilyName="Ocean Petrel">
<pluginManagerSettings>
<pluginProviders>
<adduri="{ApplicationData}SchlumbergerPetrel2024PluginManagerSettings.xml"typeName="Slb.Ocean.Core.Configuration.PluginXmlProvider,Slb.Ocean.Core" name="UserAppData" />
<adduri="{CommonApplicationData}SchlumbergerPetrel2024PluginManagerSettings.xml"type-Name="Slb.Ocean.Core.Configuration.PluginXmlProvider,Slb.Ocean.Core" name="CommonAppData" />
</pluginProviders>
<securityProvideruri="{ApplicationData}SchlumbergerPetrel2024PluginManagerSettings.xml"typeName="Slb.Ocean.Core.PluginSecurityProvider, Slb.Ocean.Core" />
</pluginManagerSettings>
...
</oceanConfiguration>
The user may still be able to install plug-ins if he or she has administrative permissions. To completely disable plug-in installation, remove the orange highlighted entry.
When Petrel starts up, plug-ins are loaded from all locations in the same order as previously listed (Petrel installation folder, all users, current user). If the PluginManagerSettings.xml is found at the specified location, the plug-ins registered in it for the current Petrel installation are loaded. If a plug-in is registered in more than one PluginManagerSettings.xml file, the plug-in is loaded from the first location where it is found.
If a plug-in is already registered in one of the three locations available for plug-in deployment, the Plug-in Manager prevents installation of the plug-in to a different location. You must first remove the plug-in before you install it to a different location.
The OceanPetrel.log, OceanPetrelException.log, and the OceanPerformance.log files' default location is in the user's %LocalAppData%\ Schlumberger\Petrel\[Petrel Version] folder.
The log files are intended to be kept in the user's local profile, but in Windows 7 %AppData% points to the user's roaming profile. For 2024 releases, this is typically\ c:\users\USERNAME\AppData\Local\Schlumberger\Petrel\2024.
Do not change this location because the user typically has permissions to write to this directory. However, the user configures it by editing the petrel.exe.config file (located in the Petrel installation directory). Follow these steps:
Open the petrel.exe.config file and locate the <loggingConfiguration section>.
Edit the <add fileName="OceanPetrel.log"/> child element to look like this:\ <add fileName=\ "%LOCALAPPDATA%\Schlumberger\Petrel\<version>\OceanPetrel.log"/>
Make the same edit in the\ <add fileName="OceanPetrelException.log"/> child element.
Save the file.
After the change, Petrel writes these log files to the logged-in user's area.
The event logging tool helps monitor performance of the Ocean plug-ins and identifies the misbehaving plug-ins if performance degrades.
Any events raised by Ocean go through a central location. This enables users to measure and time all the Ocean plug-in event handlers when they raise API events and then summarize this information to a log file.
If the Petrel user notices some performance degradation for a particular task, he or she may enable an option in Petrel under System settings - Troubleshooting*.
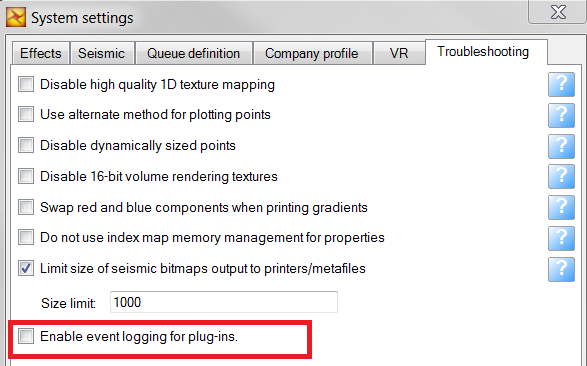
Figure 2‑8 System settings \> Troubleshooting settings
Selecting Enable event logging for plug-ins starts a session and logs the time measurement into memory until the option is disabled. When the option is cleared, summary information is added to the OceanPerformance.log file (located in the same directory as OceanPetrel.log). This information indicates the plug-ins that are called and the time spent for each.
If your plug-in must write user-defined configuration settings to the computer for future use, the recommended method is to use the standard C# mechanism defined in "Application Settings Architecture" (http://msdn.microsoft.com/en-us/library/8eyb2ct1.aspx). The recommendation is for your plug-in to store its settings in a file located in %LocalAppData%. In conjunction with Petrel 2026, this gives settings stored in:
<LocalAppData>\Schlumberger\petrel.exe_StrongName_\26.1.0.0\user.config
where:
<LocalAppData>: Is the correct location to put plug-in settings that are writable, even if the user is not a system administrator on the computer.
SLB: Is the vendor.
petrel.exe_StrongName_: Is the strong name of the associated application.
26.1.0.0: Is the version, which ensures that that you can install the 2026 and older versions of your plug-in side by side.
It is very easy to use this standard C# mechanism when you do not need to control what and how settings information is stored to %LocalAppData%.
Find additional details in MSDN at these topics:
How To: Create a New Setting at Design Time http://msdn.microsoft.com/en-us/library/bb397757.aspx
How To: Write User Settings at Run Time with C# http://msdn.microsoft.com/en-us/library/bb397755.aspx
How To: Read Settings at Run Time with C# http://msdn.microsoft.com/en-us/library/bb397759.aspx