After the Team and App are set up, the Team members must create a Client to consume APIs programmatically or implement authentication for application being developed.
For different authentication flows, different client types must be created. Follow the steps to create a different client type to match your application type.
| Application type | Authentication flow | Authentication type | Detailed steps |
|---|---|---|---|
| Server-side (Web) | Authorization Code Flow | User Authentication | Click here |
| Single-Page Application (SPA) | Authorization Code Flow with PKCE | User Authentication | Click here |
| Native (mobile, desktop) | Authorization Code Flow with PKCE | User Authentication | Click here |
| Service (unattended workload) | Client Credentials Grant | Service Account | Click here |
In the Developer Portal, navigate to te My Apps tab and select the Team from the drop-down menu. This opens the My Apps page showing the list of Apps created for the selected Team.
Click the Clients tab.
Click Add New client.
Enter a name for the Client. The Client name is a human-readable name for your Client. A unique Client ID is generated that you should use in your applications for authentication and authorization. Alternatively, you may use a custom Client ID by checking the "Custom Client ID" box and providing the custom Client ID. The Client ID must be at least 32 characters long and unique in SLB Authenticator.
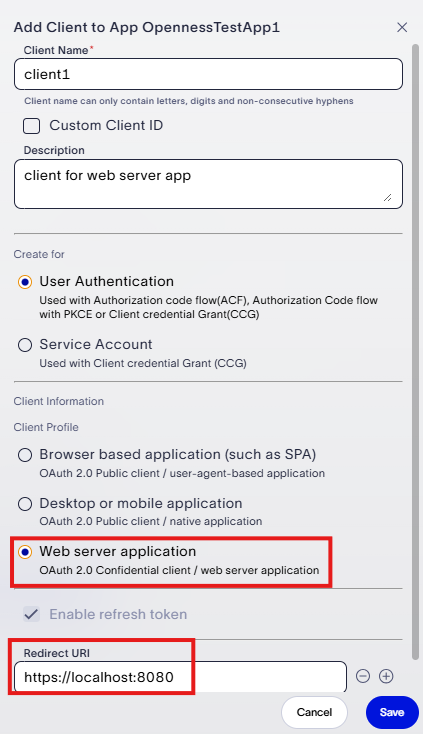
(Optional) Enter a Description.
Under Create for, select User Authentication as the authentication type.
Under Client Profile select Web server application. Use the Confidential Client type for a web client, client profile. Make sure that you note the Secret because it is not recoverable.
Enter the Redirect URI where applicable (the POST endpoint receiving the user's id_token). This is required if you want to use the Authorization Code Flow (ACF) grant as per OAuth 2.0 and OIDC standards.
Click Save. If you chose Web server application for the Client Profile, a secret for the Client is generated and shows up on the screen. You must copy and save the secret so you can use it later for authentication and authorization; it is not recoverable. However, you can reset Client secrets when needed as described in Reset Client Secret. The secret should not be shared with developers outside the Team.
The newly created client appears in the list of Clients on the Clients tab.
- In the Developer Portal, navigate to the My Apps tab and select the Team from the drop-downmenu. This opens the My Apps page showing the list of Apps created for the selected Team.
- Click the Clients tab.
- Click Add New client.
- Enter a name for the Client. The Client name is a human-readable name for your Client. A unique Client ID is generated that you should use in your applications for authentication and authorization. Alternatively, you may use a custom Client ID by checking the "Custom Client ID" box and providing the custom Client ID. The Client ID must be at least 32 characters long and unique in SLB Authenticator.
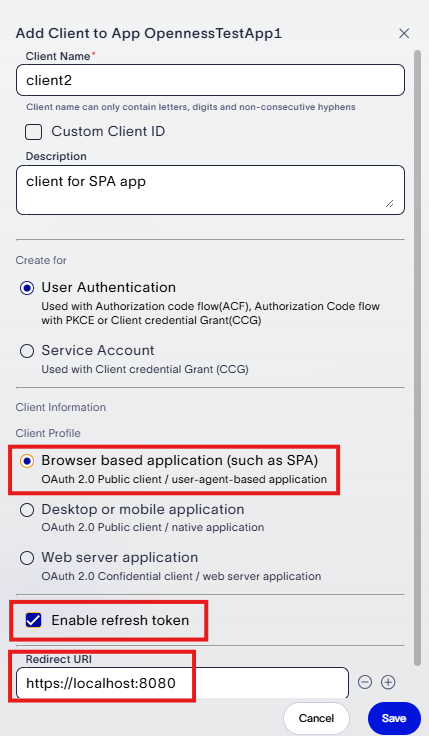
- (Optional) Enter a Description.
- Under Create for, select User Authentication as the authentication type.
- Under Client Profile select Browser based application (Such as SPA). Use OAuth 2.0 Public Client type for a user-agent-based application client profile.
- Enter the Redirect URI where applicable (the POST endpoint receiving the user's id_token). This is required if you want to use the Authorization Code Flow (ACF) grant as per OAuth 2.0 and OIDC standards.
- Click Save. The newly created client appears in the list of Clients on the Clients tab.
- In the Developer Portal, navigate to the My Apps tab and select the Team from the drop-down menu. This opens the My Apps page showing the list of Apps created for the selected Team.
- Click the Clients tab.
- Click Add New client.
- Enter a name for the Client. The Client name is a human-readable name for your Client. A unique Client ID is generated that you should use in your applications for authentication and authorization. Alternatively, you may use a custom Client ID by checking the "Custom Client ID" box and providing the custom Client ID. The Client ID must be at least 32 characters long and unique in SLB Authenticator.

- (Optional) Enter a Description.
- Under Create for, select User Authentication for the authentication type.
- Under Client Profile select Desktop or mobile application. Use OAuth 2.0 Public Client type for a native and mobile application client profile.
- Enter in the Redirect URI where applicable (the POST endpoint receiving the user's id_token). This is required if you want to use the Authorization Code Flow (ACF) grant as per OAuth 2.0 and OIDC standards.
- Click Save. The newly created client appears in the list of Clients on the Clients tab.
- In the Developer Portal, navigate to the My Apps tab and select the Team from the drop-down menu. This opens the My Apps page showing the list of Apps created for the selected Team.
- Click the Clients tab.
- Click Add New client.
- Enter a name for the Client. The Client name is a human-readable name for your Client. A unique Client ID is generated that you should use in your applications for authentication and authorization. Alternatively, you may use a custom Client ID by checking the "Custom Client ID" box and providing the custom Client ID. The Client ID must be at least 32 characters long and unique in SLB Authenticator.
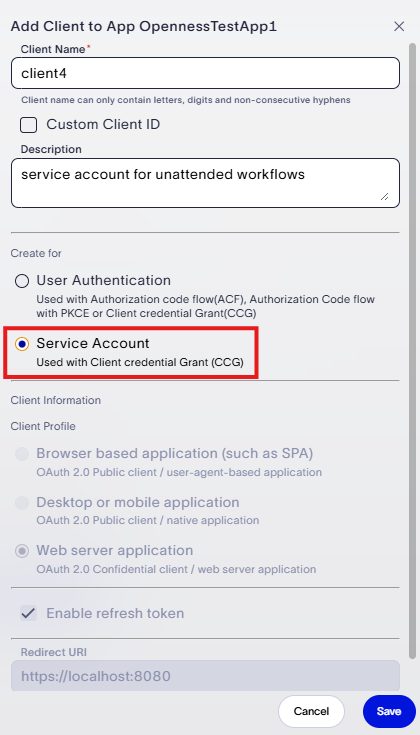
- (Optional) Enter a Description.
- Under Create for, select Service Account. Refer to Considerations when onboarding service accounts. Use this option when access is being requested on behalf of an application, not a user. Refer to Authentication and Authorization Flows documentation for more details.
By default, the Client Profile is selected as Web server application, Enable refresh token is selected, and Redirect URI is not needed. - Click Save. A secret for the Client is generated and shows up on the screen. You must copy and save the secret so you can use it later for authentication and authorization; it is not recoverable. However, you can reset Client secrets when needed as described in Reset Client Secret. The secret should not be shared with developers outside the Team.
The newly created client appears in the list of Clients on the Clients tab.